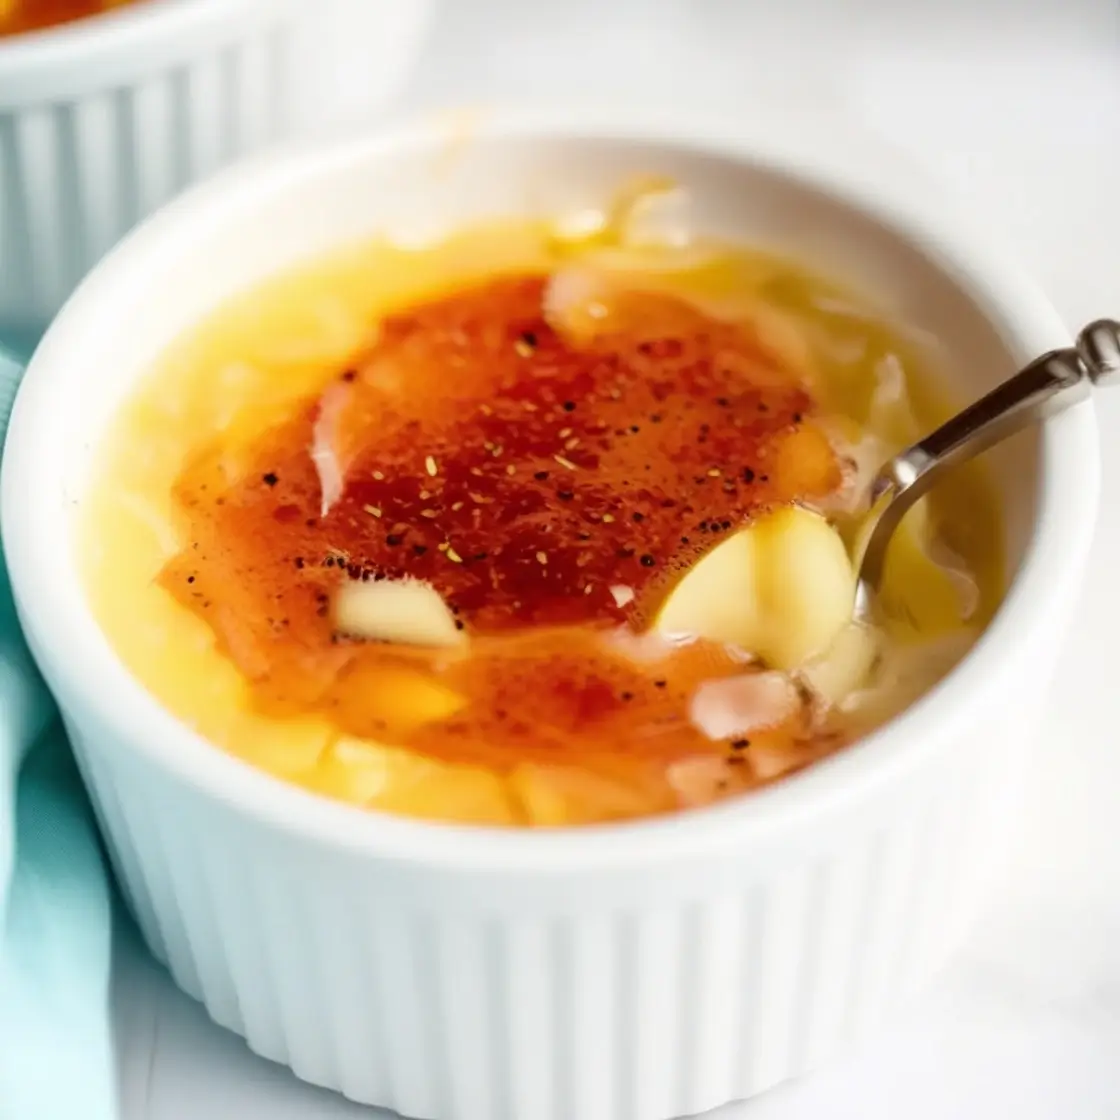
Let’s be honest: crème brûlée has that “fancy restaurant dessert” vibe that makes it seem intimidating. The golden, glass-like sugar crust, the creamy custard—everything about it screams “expert-only.” But here’s the big secret: it’s not hard to make. Once you know the basics, it’s one of the simplest desserts you can whip up in your kitchen. Trust me, I’ve been there, thinking it was this significant, complicated process, only to discover that crème brûlée is super approachable.
So, what’s the secret? It’s all about mastering simple techniques, using good ingredients, and adding flair. By the end of this post, you’ll be cracking into your homemade crème brûlée and wondering why you didn’t try it sooner.
What Exactly Is Crème Brûlée?
Crème brûlée, which translates to “burnt cream” in French, is a classic dessert made up of two main components:
- A silky, vanilla-infused custard. Think rich, creamy, and smooth.
- A caramelized sugar topping. It’s torched to create a crispy layer you crack into with your spoon.
That’s it—just two parts. But somehow, this dessert manages to feel super luxurious. And part of the fun is that satisfying crack when you break the sugar crust. It’s like ASMR for dessert lovers.
The Secret to Perfect Crème Brûlée
Alright, let’s get down to it. The secret to perfect crème brûlée lies in three things:
- The right ingredients. Quality makes a difference here. Use fresh cream, good vanilla (not the fake stuff!), and fresh eggs.
- Patience. It’s not a dessert you can rush. You need to let the custard appropriately set in the oven and chill in the fridge before adding the sugar topping.
- A steady hand with the torch. That crispy sugar topping isn’t just about looks but flavor and texture. Nailing the caramelization is key.
Step-by-Step Guide to Making Crème Brûlée
Here’s my foolproof method for making crème brûlée at home. It’s easier than you think!
Ingredients:
- 2 cups heavy cream
- 5 large egg yolks
- ½ cup granulated sugar (plus extra for topping)
- 1 teaspoon pure vanilla extract (or the seeds from one vanilla bean)
- A pinch of salt
Instructions:
- Prep Your Equipment:
- Preheat your oven to 325°F. Place your ramekins (those cute little custard cups) in a baking dish with high sides. You’ll need enough space to pour water around them for a water bath later.
- Make the Custard Base:
- Heat the heavy cream over medium heat in a small pot until it’s hot but not boiling. You’ll see tiny bubbles forming around the edges—stop there! Please remove it from the heat and let it cool slightly.
- Mix the Yolks and Sugar:
- Whisk the egg yolks, sugar, vanilla, and salt in a bowl until the mixture is pale and creamy. Slowly pour the warm cream into the yolk mixture, whisking constantly. (Pro tip: Go slow to avoid scrambling the eggs!)
- Strain for Smoothness:
- Pour the mixture through a fine mesh strainer into another bowl. This step catches any little lumps and ensures your custard is silky smooth.
- Fill the Ramekins:
- Divide the custard evenly among your ramekins. Don’t overfill—leave a little space at the top.
- Create a Water Bath:
- Carefully pour hot water into the baking dish around the ramekins until it reaches halfway up the sides. This helps the custard cook gently and evenly.
- Bake:
- Bake for 35–45 minutes until the custard is set but still jiggles slightly in the center when you tap the ramekin. Remove them from the water bath and let them cool to room temperature. Then, chill in the fridge for at least 4 hours (or overnight).
- Torch Time:
- When you’re ready to serve, sprinkle a thin layer of sugar evenly over the custards. Use a kitchen torch to caramelize the sugar until it’s golden and crispy. If you don’t have a torch, you can broil them, but keep a close eye so they don’t burn.
How Crème Brûlée Fits Into American Dessert Culture
Crème brûlée might have French origins, but it’s found a special place on American dessert menus. From upscale steakhouses to cozy bistros, this creamy classic is a staple many Americans associate with celebratory meals or fancy date nights. Interestingly, people often view it as a “splurge dessert,” making it even more exciting to recreate at home. There’s nothing like serving this restaurant-quality treat and watching everyone’s eyes light up when they hear that iconic sugar crust crack.
The Role of Vanilla in Crème Brûlée’s Magic
When it comes to flavor, vanilla is the heart of crème brûlée. Whether using a high-quality extract, vanilla bean paste, or the seeds scraped from a pod, the vanilla gives the custard its signature aroma and taste. For purists, nothing beats the visual appeal of those tiny black specks of vanilla bean scattered through the creamy custard. If you want to impress your guests, splurging on a real vanilla bean can make a world of difference—and hey, it’s worth it for that extra wow factor.
Pair your dinner sides with Chicken Parmesan with Alfredo Sauce for rich, creamy comfort and Steak Pasta for hearty, flavorful balance. Perfect combo!
FAQs About Crème Brûlée
1. Can I make crème brûlée without a torch?
Absolutely! If you don’t have a torch, use your oven’s broiler. Place the ramekins under the broiler for 1–2 minutes, keeping a close eye to avoid burning. The sugar will still caramelize, but you might not get the same even crust as with a torch.
2. What’s the best way to serve crème brûlée?
Crème brûlée is best served chilled with the sugar crust freshly torched. You can garnish it with fresh berries, a dollop of whipped cream, or even a sprig of mint if you’re feeling fancy. (Pro tip: The garnish is optional—the real star is that custard and sugar combo.)
3. How long does crème brûlée last in the fridge?
You can store the custard (without the sugar topping) in the fridge for up to 3 days. Torch the sugar topping right before serving for the best texture.
4. What if my custard doesn’t set?
If your custard is runny after baking, it probably didn’t cook long enough. Every oven is different, so keep an eye on the jiggle. It should wobble slightly in the center, like gelatin, but not be liquid.
5. Can I flavor my crème brûlée with something other than vanilla?
Definitely! For a twist, try infusing the cream with coffee, orange zest, or even lavender. Just remember to strain the mixture well before baking.
Troubleshooting Common Crème Brûlée Issues
Problem: My sugar topping is burnt.
Solution: Hold the torch farther away and move it in a circular motion. Don’t let the flame stay in one spot for too long.
Problem: The custard is grainy.
Solution: This usually happens if you overcooked the custard or didn’t strain the mixture. Be gentle and patient during the baking process.
Problem: The sugar crust is too thick.
Solution: Use a light hand when sprinkling the sugar. A thin, even layer caramelizes best.
Fun Variations to Try
Once you’ve mastered the classic crème brûlée, you can experiment with fun flavors:
- Chocolate Crème Brûlée: Swap out some cream for melted dark chocolate.
- Matcha Crème Brûlée: Add a teaspoon of matcha powder to the custard mixture for a green tea twist.
- Salted Caramel Crème Brûlée: Mix a spoonful of caramel sauce into the custard before baking, and sprinkle a pinch of sea salt on top.
Why You’ll Love Making Crème Brûlée
Let me tell you, there’s something ridiculously satisfying about making a dessert that feels so elegant. Your guests will think you’re some culinary genius, and honestly, you are! Plus, crème brûlée is endlessly customizable, so you can make it your own every time.
And if you’re anything like me, you’ll find yourself torching that sugar crust just for fun. There’s a little pyromaniac in all of us. No shame here.
In Conclusion
The secret to crème brûlée isn’t hidden chef magic—it’s all about patience, good ingredients, and a little confidence. Once you try it, you’ll see how easy and fun it is to make this dreamy dessert right in your kitchen. So go ahead, grab those ramekins, and get cracking—literally!
More Amazing Recipes to Try 🙂
Have questions or tips of your own? Drop them in the comments—I’d love to hear from you! If you make this recipe, let me know how it turns out.


